Views: 175 Author: Site Editor Publish Time: 2025-09-11 Origin: Site


When you touch prepreg, it feels smooth and a bit sticky. It does not feel like dry fabric. Prepregs often look like shiny tape or sticky cloth. The resin makes them look glossy. You might see small wrinkles if you look closely. Sometimes, you can spot foreign objects in the prepreg. These things help you know what prepreg is. In composite work, you look for these signs. They help you find mistakes and check if the prepreg looks right. When you handle prepregs, you learn to spot them fast. Their feel and shiny look are easy to notice.
Common features you can see:
Wrinkles
Foreign objects
Layup errors
Wrong material types
Prepreg feels smooth and sticky. It looks shiny because of the resin. This makes it easy to spot. It looks different from dry fabric.
You can see small wrinkles on prepreg. Sometimes there are tiny objects stuck in it. The surface should look clean. Always look for these signs to check quality.
Prepreg comes as sheets, rolls, or tapes. Pick the form that fits your project. Think about the shape and size you need.
You must be careful when handling prepreg. Always wear gloves to protect it. Use clean tools every time. Work in a neat space to keep it good.
The color and fiber patterns help you know the prepreg type. This is important for your project to work well.
When you look at prepreg, you see things that make it different from dry fabric. Prepreg stands out because it has a smooth surface with resin in it. The finish is shiny and looks almost wet. This shine comes from the resin that covers the fibers. The resin holds the fibers together. Prepreg does not feel rough or loose like dry fabric. When you touch it, it feels a little sticky. This sticky feeling helps you know it is prepreg.
Prepreg is called a B-stage material. This means it is not fully hard yet. You can bend or shape it, but it will not pour like a liquid. Makers try to keep prepregs free from defects or foreign things. You should always check that the surface is clean and even before using it.
Prepreg color changes with the fiber and resin type. You might see black, white, yellow, amber, or cream. Some prepregs look clear over the fiber. Others look more solid in color. The table below shows color types from different makers:
| Product Code | Description | Color Variation |
|---|---|---|
| AX-4180 | Low OSU / FST Epoxy Aramid Prepreg | White on yellow |
| AX-4201XL | Toughened Epoxy Aramid Laminating Prepreg Extra-long Outlife | Clear on yellow |
| AX-4300 | High Temperature Phenolic Laminating Aramid Prepreg | Amber on yellow |
| AX-5112T | High Toughness, Flame Retardant Epoxy Carbon Prepreg | Off-white on black |
| AX-5170 | Cyanate Ester Carbon Prepreg | Clear on black |
| AX-3180 | Low OSU /FST Epoxy Fiberglass Prepreg | White on white |
| AX-3270 | Structural Epoxy Fiberglass Prepreg | Cream on white |
You can use color to help tell what kind of prepreg you have. Carbon fiber prepregs are often black or clear on black. Fiberglass prepregs are usually white or clear on white. Aramid prepregs may look yellow or cream.
When you touch prepreg, it feels smooth and a bit sticky. The stickiness comes from the resin on the fibers. Prepreg has a texture that is even, with no loose threads or dry spots. You should not feel rough or dry places. If you do, the prepreg might have a problem.
You might see small wrinkles or bubbles. These show common problems like bubbles or fibers not lined up right. Here are some problems you might find:
Voids: Small bubbles inside the prepreg.
Fiber Misalignment: Fibers that are not straight.
Surface Defects: Tearing or layers coming apart.
Tip: Gently run your hand over the prepreg to check if it is smooth. Good prepreg feels even and sticky, not rough or dry.
The surface of prepreg should be clean and shiny. You should not see dirt, dust, or other things on it. The resin makes the prepreg look glossy. This shine helps you see problems easily. If you see dull spots, wrinkles, or bubbles, look at the prepreg more closely.
Makers use different ways to check the surface of prepregs. These include:
| Method | Description |
|---|---|
| Micro-computed tomography | Looks inside for small problems and checks for defects. |
| NIR spectroscopy | Checks the resin and fiber quality. |
| Ultrasonics | Finds flaws and checks the surface. |
| Visual Inspection | Looks for bumps, wrinkles, or foreign things. |
Most prepregs go through careful checks for quality. Makers use risk checks, close inspections, lab tests, and tracking to make sure each batch is good. This care helps you get the same results every time you use prepreg in your projects.
Prepregs come in several forms to fit different needs. You will often see them as sheets, rolls, or tapes. Each form has its own look and handling style. Knowing these forms helps you choose the right prepreg for your project.
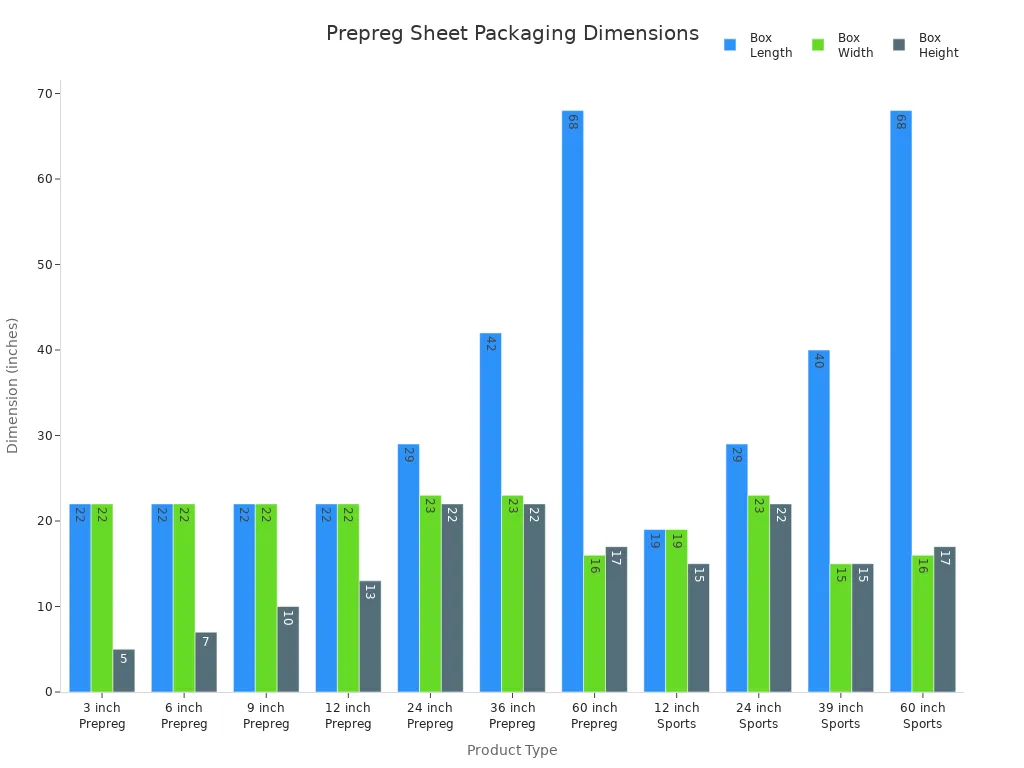
You can find prepreg sheets packed flat in boxes. These sheets are easy to stack and cut. They work well for making large, flat parts. The size of the box depends on the sheet size. Here is a table showing common box sizes for prepreg sheets:
| Product Type | Box Length | Box Width | Box Height |
|---|---|---|---|
| 3 inch Prepreg | 22 | 22 | 5 |
| 6 inch Prepreg | 22 | 22 | 7 |
| 9 inch Prepreg | 22 | 22 | 10 |
| 12 inch Prepreg | 22 | 22 | 13 |
| 24 inch Prepreg | 29 | 23 | 22 |
| 36 inch Prepreg | 42 | 23 | 22 |
| 60 inch Prepreg | 68 | 16 | 17 |
| Fiberglass Prepreg | 48 | 16 | 16 / 18 |
You can also see a chart that compares the box sizes for different prepreg sheets:
Prepregs in roll form look like big spools of shiny fabric. You can unroll them to cover large or curved surfaces. Rolls are flexible because the resin is only partly cured. This makes them easy to shape and handle. The tacky surface helps layers stick together during layup. You will notice that rolls have more flexibility than sheets or tapes. The resin content in prepregs affects how easy they are to use. Higher resin content makes handling easier, but lower resin content gives better strength in the final part.
Prepregs are semi-finished and flexible.
Sheets and tapes may not bend as easily.
The sticky feel of prepregs helps you during layup.
Prepreg tapes are narrow strips. You use them for detailed work or small repairs. Tapes are popular in aerospace because they fit tight spaces and curves. The most common tape width is 80 mm, and the thickness is 0.25 mm.
| Width (mm) | Thickness (mm) |
|---|---|
| 80 | 0.25 |
You can cut tapes to the length you need. Their small size makes them easy to handle and place with precision.
Tip: Choose the prepreg form that matches your part shape and size. Sheets work for flat parts, rolls for large or curved surfaces, and tapes for details.
Prepreg carbon fiber is easy to spot. It looks very black and shiny. The resin makes it look wet and glossy. You can see a pattern in the fibers. The pattern looks like squares or slanted lines. This comes from how the fibers are put together. When you touch it, it feels smooth and a little sticky. The stickiness helps you place it during layup. People use prepreg carbon fiber for strong and light parts. Bike frames and car panels often use this material. It is popular because it looks cool and works well. You can buy prepreg carbon fiber in rolls, sheets, or tapes. These products are easy to use and give good results.
Tip: Pick prepreg carbon fiber if you want a part that is strong and light. Its shiny black look makes it simple to spot.
Fiberglass prepregs look different from carbon fiber. They are white or clear and have a shiny surface. The resin makes them smooth but not dark. When you touch fiberglass prepreg, it feels sticky and bends easily. You use it for parts that need to be strong and safe around electricity. Many projects use fiberglass prepregs because they are simple to cut and shape. You can get them as sheets, rolls, or tapes. The surface is smooth and clean. This helps you see any problems before you use it.
Aramid prepregs are yellow or cream colored. The resin makes them smooth and shiny. The fibers look different from carbon fiber and fiberglass. You often see aramid prepregs in planes and safety gear. The weave pattern changes how it looks and feels. Here is a table with common aramid weave patterns:
| Weave Pattern | Description | Advantages | Limitations |
|---|---|---|---|
| Plain Weave | The yarns go over and under each other. | Strong and spreads force well. | Not very flexible and hard to shape. |
| Twill Weave | The yarns cross in a slanted pattern. | Good mix of strength and bending. | Sometimes not as strong as plain weave. |
| Satin Weave | The yarns float over many others before crossing. | Very flexible and smooth. | Not as strong as the other weaves. |
You pick the weave for your project needs. Plain weave is strong, twill weave bends well, and satin weave is smooth. Aramid prepregs help make parts that can take hits and last a long time.
You can spot prepregs by looking for a glossy, almost wet surface. The resin gives them a shine that stands out from dry fabrics. Dry fabrics look dull and feel rough. Prepregs often show a clear fiber pattern, like squares or diagonal lines, depending on the weave. You might notice small wrinkles or bubbles on the surface. These marks can help you check for quality. Clean prepregs should not have dirt, dust, or foreign objects. If you see any, you should not use that piece.
A quick checklist for visual identification:
Shiny, smooth surface
Visible fiber pattern
No loose threads
No dry or rough spots
No foreign matter
Tip: Hold the prepreg up to the light. The shine and fiber pattern become easier to see.
When you touch prepregs, you feel a sticky texture. This stickiness comes from the resin already inside the material. It helps you place and align the layers during your composite project. Dry fabrics do not feel sticky. They need extra resin and can be harder to keep in place. Prepregs also feel more flexible than dry fabrics. You can bend and shape them without much effort. The resin in prepregs makes them easy to handle, even for beginners.
You should always wear gloves when handling prepregs. The resin can stick to your skin. Use clean tools and a tidy workspace. This keeps the prepregs free from dirt and damage. If you notice any rough or dry spots, set that piece aside.
A simple table for handling tips:
| Step | What to Do |
|---|---|
| Wear gloves | Protect your hands |
| Use clean tools | Avoid contamination |
| Work in clean area | Keep prepregs spotless |
| Check for defects | Look and feel for issues |
Note: Good handling keeps your composite parts strong and reliable.
You need to handle prepregs with care to get the best results. Always wear gloves when you touch prepregs. The resin can stick to your skin and leave marks. Use clean scissors or cutters to trim the edges. Dirt or dust can ruin the surface and weaken the composite part. Keep your workspace tidy and free from clutter. You should store prepregs in a cool place. Heat can start the curing process too soon.
Here are some simple steps for how it is used:
Put on gloves before you start.
Lay out the prepregs on a clean table.
Cut the material to the right size.
Place each layer carefully to avoid wrinkles.
Press the layers gently to help them stick together.
Tip: If you see bubbles or rough spots, smooth them out before you move to the next step. This helps you make a strong and smooth composite part.
When you use prepregs, you will notice changes in how it looks. At first, the material feels sticky and looks shiny. The resin covers the fibers and gives a wet look. As you start the curing process, the resin changes. It goes from a thick liquid to a solid. This change is important because it holds the fibers together and makes the composite strong.
During the early stage of curing, the resin stays stable. You can still shape and adjust the prepregs. The system can release gases and volatiles, which helps prevent bubbles. As curing continues, the prepregs lose their sticky feel. The surface becomes hard and smooth. You will see the fiber pattern more clearly. The final part looks glossy and feels solid.
You can check how it is used by watching the surface. If the prepregs look dull or have bubbles, you may need to fix the layup. A good composite part has a shiny, even finish with no defects.
| Stage | What You See | What You Feel |
|---|---|---|
| Before Curing | Shiny, sticky surface | Soft, flexible |
| Early Curing | Wet look, stable | Still shapeable |
| After Curing | Glossy, hard surface | Solid, strong |
Note: Watching the changes in prepregs during use helps you make better composite parts.
When you look at a prepreg pcb, you see thin layers pressed between copper sheets. These layers look smooth and even. The prepregs inside the board hold everything together. You will not see loose fibers or rough spots. Each layer in the pcb stackup looks flat and clean. The prepregs give the board a solid feel. You can spot the different layers if you look at the edge of a multilayer pcb. The stackup shows a pattern of copper and prepreg layers stacked in order. This pattern helps you understand how the board works.
A multilayer board uses many prepregs in its stackup. You might notice the board feels sturdy and does not bend easily. The prepregs make the stackup strong and help the board last longer. When you check a pcb stackup, you want to see no gaps or bubbles between the layers. A good stackup means the board will work well in your project.
You use prepreg pcb in many electronic devices. The prepregs help build a strong and reliable multilayer pcb. Each stackup in a multilayer board supports signals and power. The stackup design decides how well the board works. You find prepreg pcb in computers, phones, and cars. These boards use a special stackup to fit many circuits in a small space.
The stackup in a multilayer pcb affects how signals move and how heat spreads. You want a stackup that keeps signals clear and parts cool. The table below shows how the right stackup helps your board:
| Aspect | Impact |
|---|---|
| Mechanical Durability | A balanced prepreg thickness provides structural integrity, preventing cracks and delamination. |
| Electrical Performance | Thickness influences dielectric constant and impedance, critical for maintaining signal integrity. |
| Thermal Management | A slightly thicker prepreg improves thermal resistance, protecting components from heat degradation. |
You should always check the pcb stackup before you start your project. A good stackup uses the right prepregs and copper layers. This makes your multilayer pcb strong and safe. When you plan your stackup, you help your composite board last longer and work better.
Tip: Always review the pcb stackup and prepregs before making a multilayer board. This step helps you avoid problems and build better electronics.
You can tell prepreg by its smooth and sticky surface. It looks shiny and glossy. The color and fiber pattern make it different from other materials. If you use special lights, carbon fabric prepregs show special textures. This makes it easier to spot them.
Shiny, wet look
Feels sticky
Easy-to-see fiber patterns
No loose threads
Tip: The more you work with prepreg, the easier it is to know what it looks and feels like. Practice helps you pick the right material with confidence.
You will notice prepreg feels sticky and looks shiny. Dry fabric feels rough and looks dull. Prepreg already has resin in it. Dry fabric needs resin added before you use it.
You should keep prepreg in a cool, dry place. Most people store it in a freezer or refrigerator. This slows down the curing process and keeps the prepreg usable for longer.
You should always wear gloves when handling prepreg. The resin can stick to your skin and leave marks. Gloves keep the prepreg clean and protect your hands.
Check for dry spots, a hard surface, or a loss of stickiness. If prepreg feels brittle or does not stick, it may have started to cure. You should not use prepreg that shows these signs.
Sharp scissors or a utility knife work best. Clean tools help you make smooth cuts. Dull blades can tear the fibers or leave rough edges.


